

Green Divider Plant Design & Installation
InstallOverview
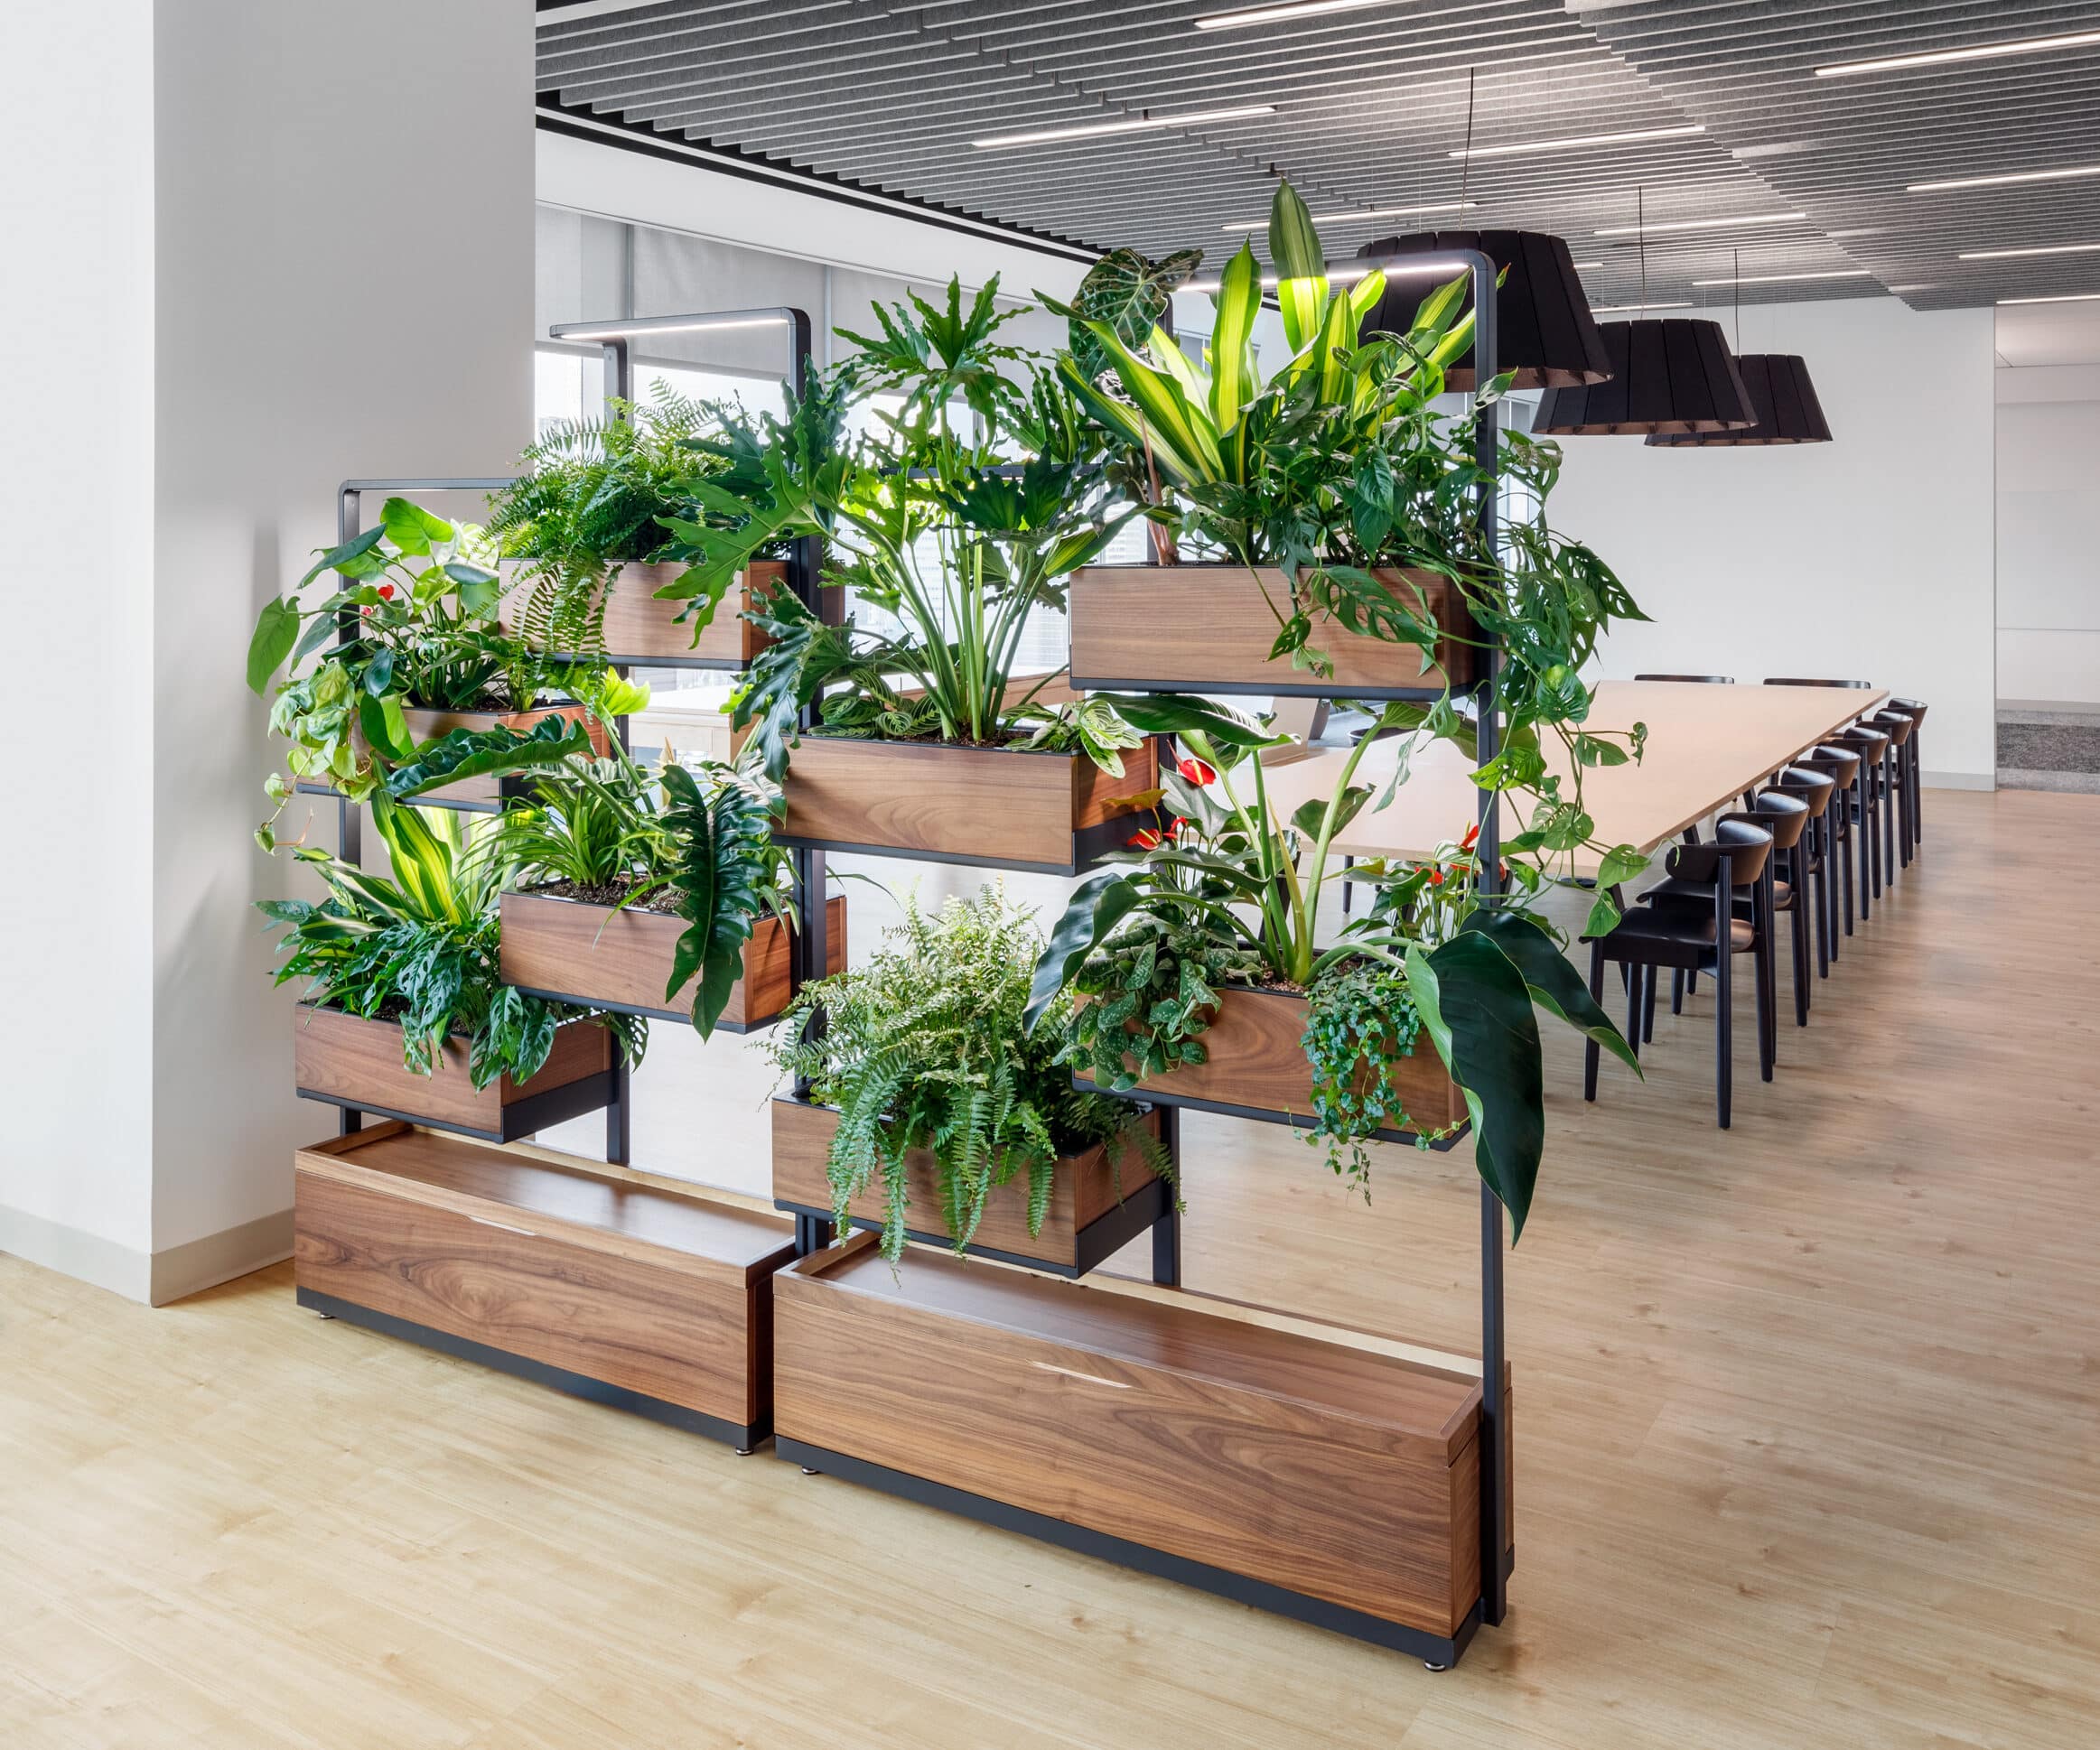
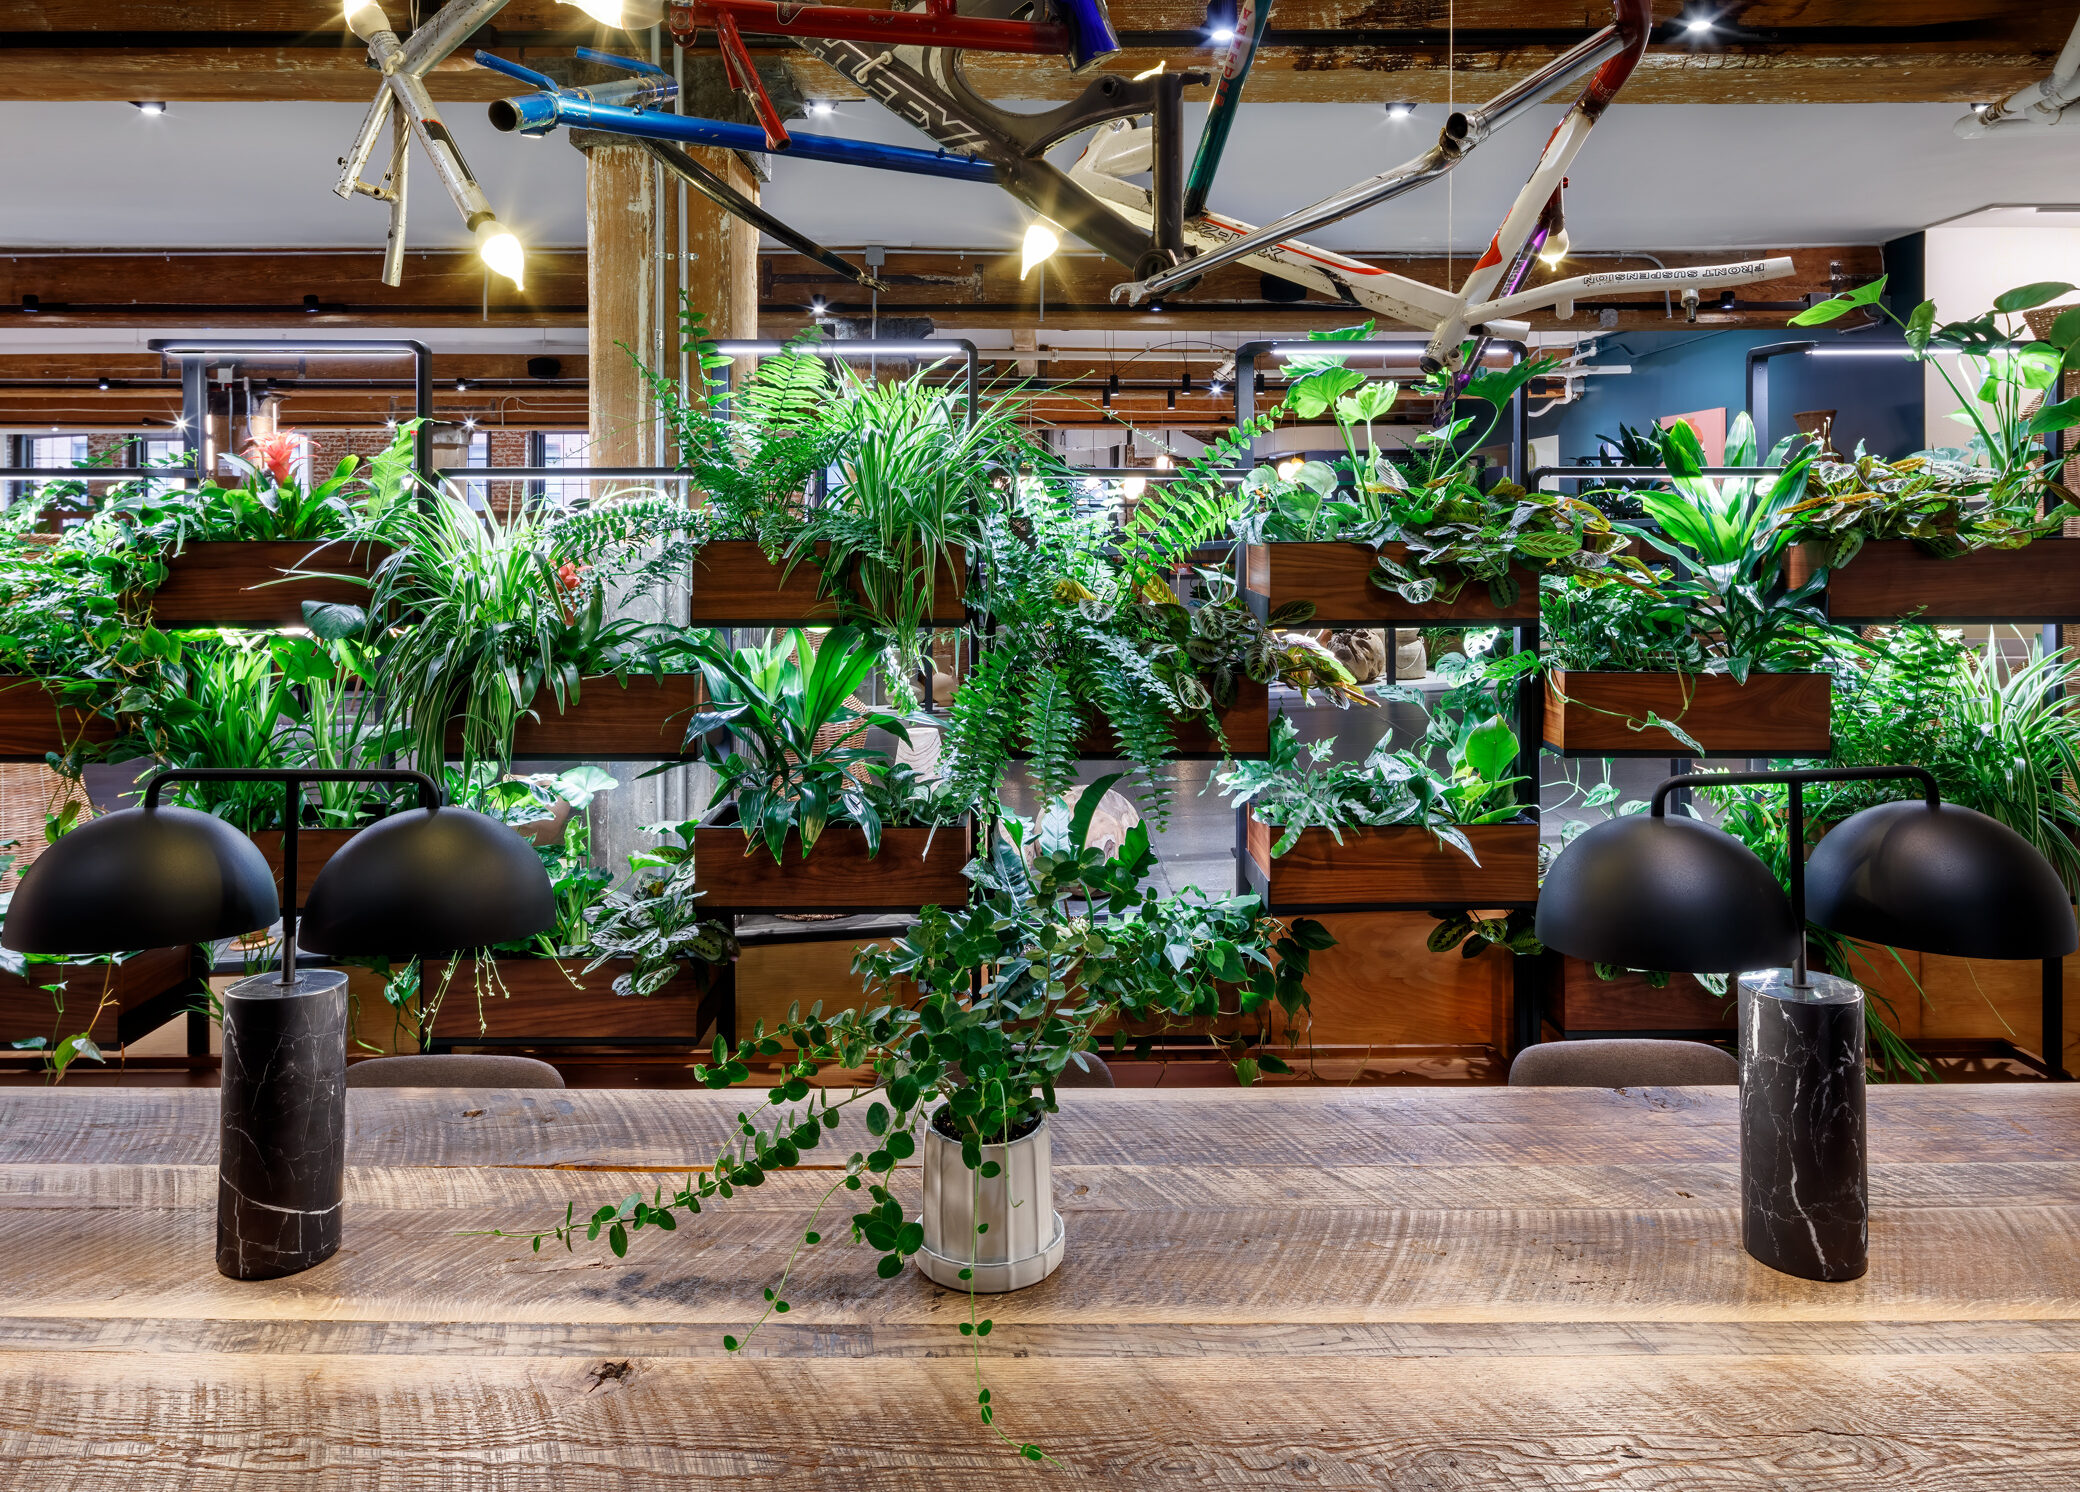
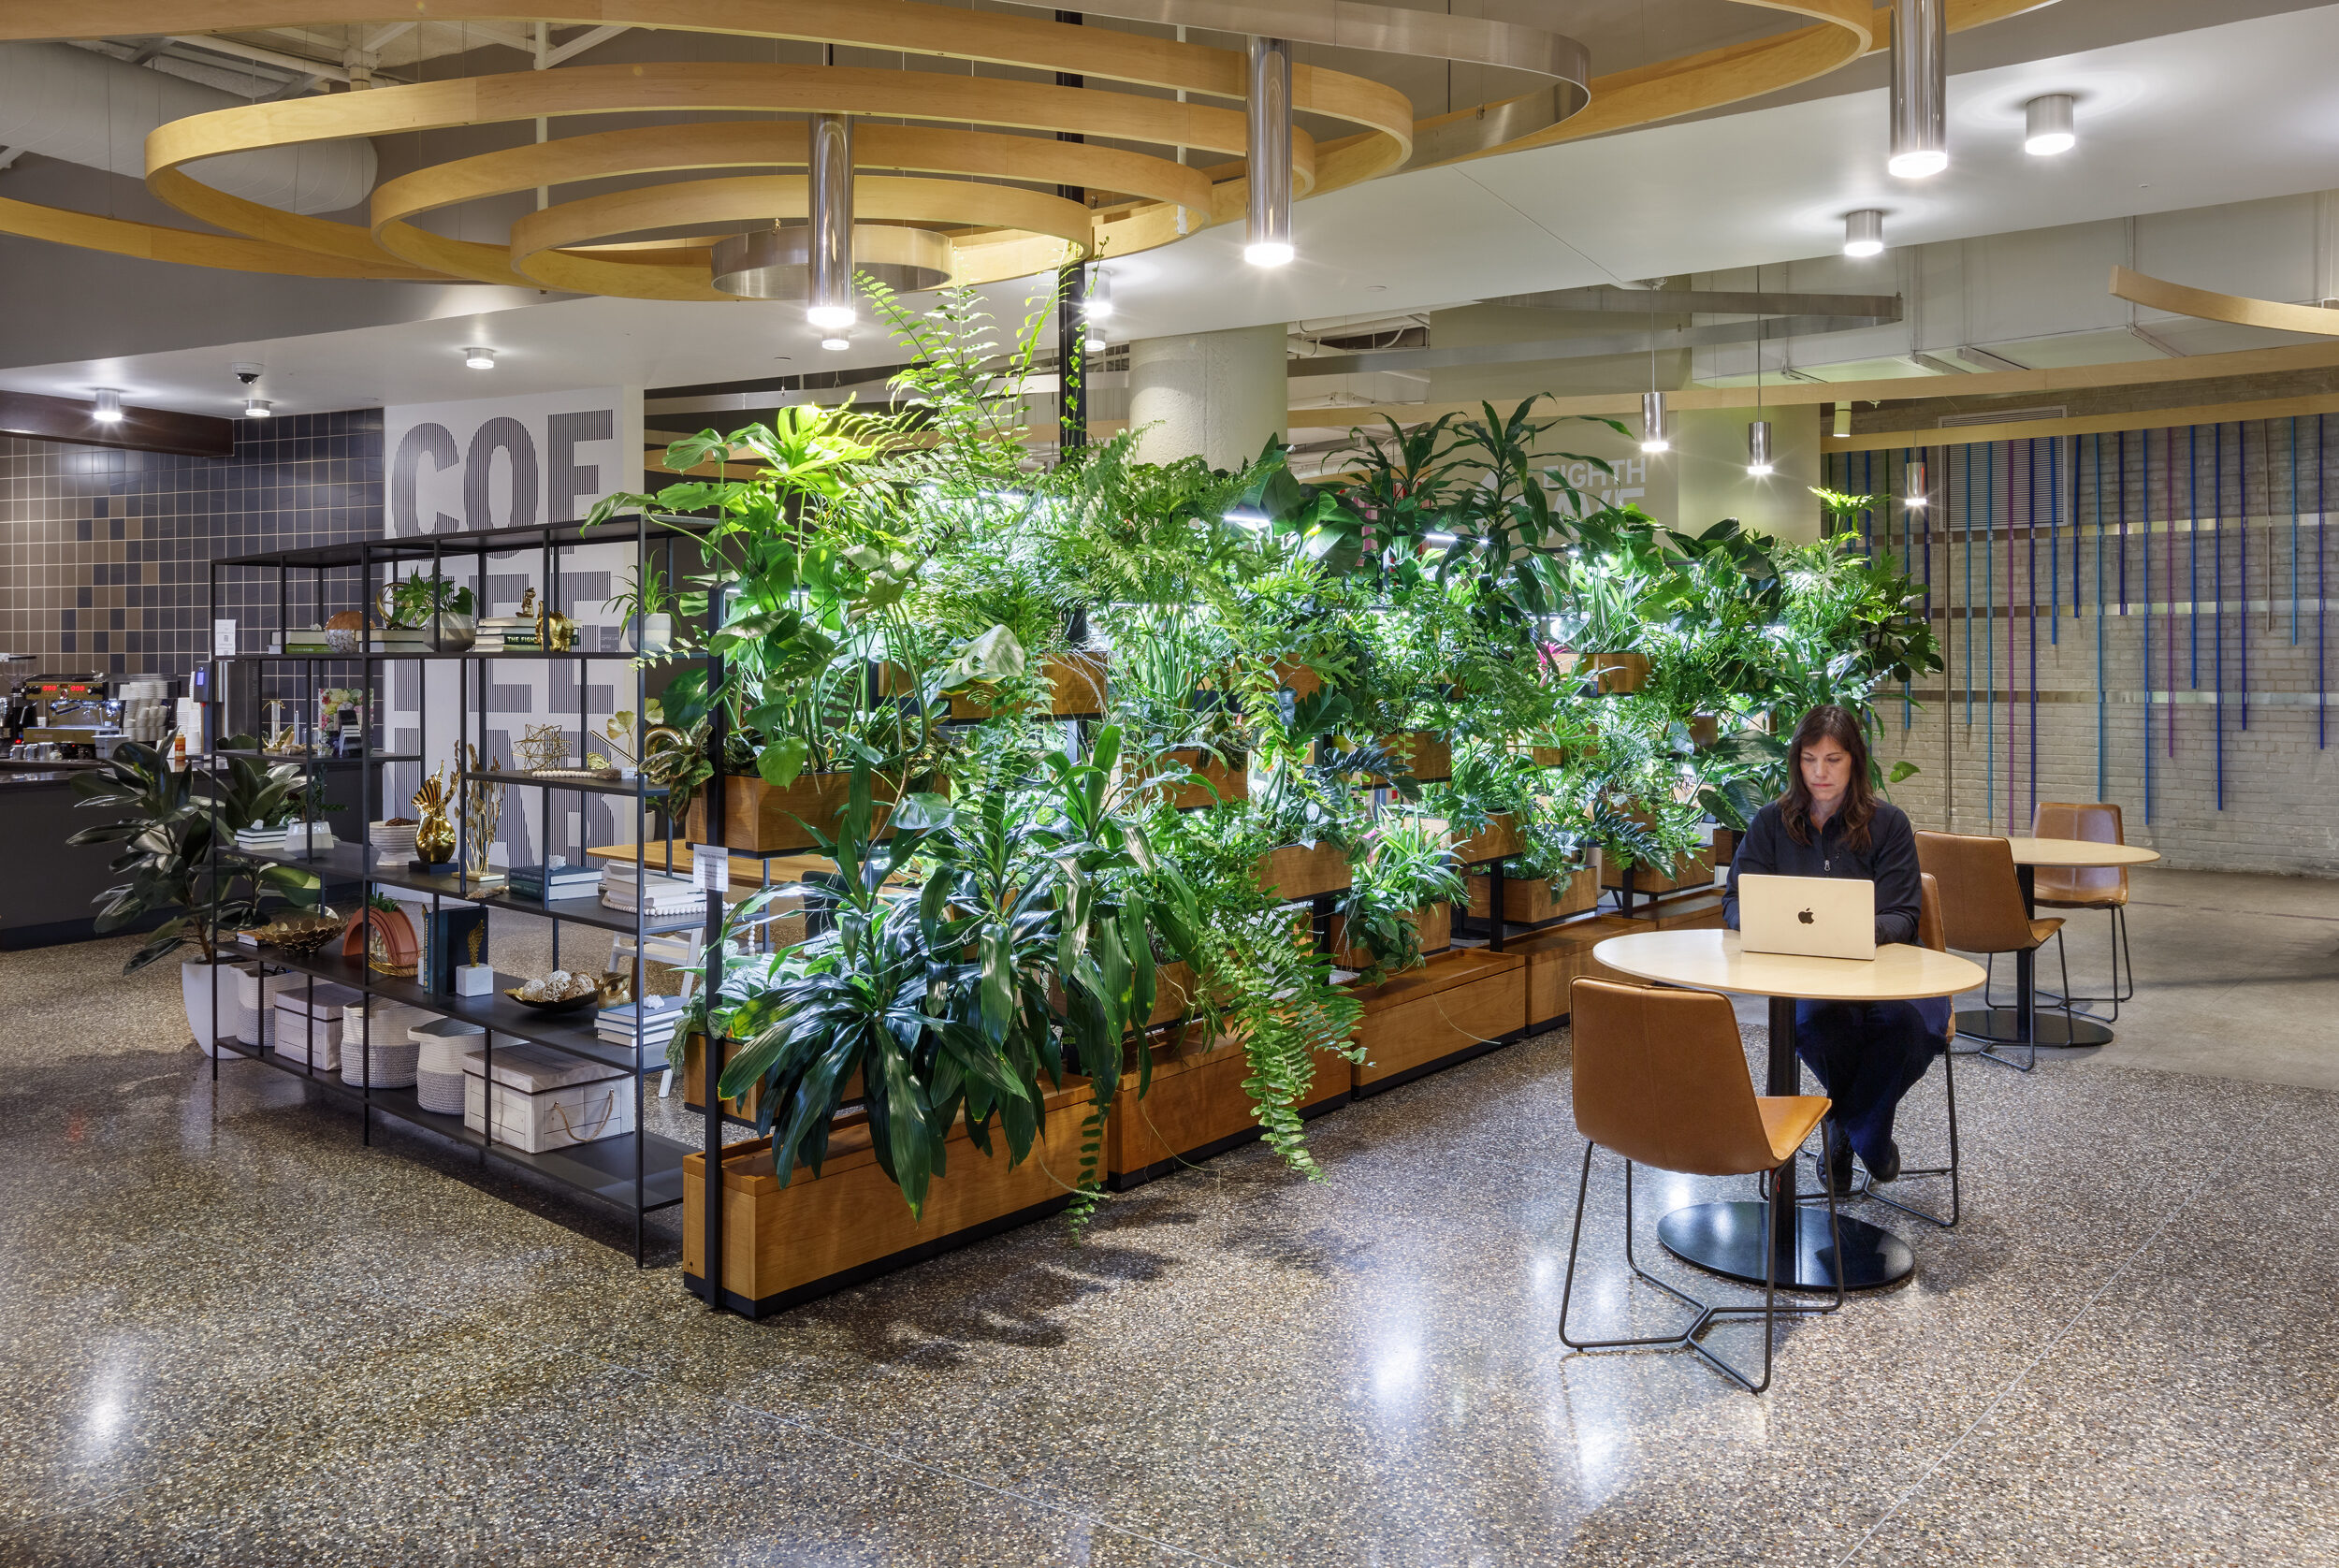
A successful Green Divider display combines thoughtful plant pairing with strong visual composition. By selecting species with similar moisture needs and arranging them to spill over and fill the boxes, you can create a lush, dynamic installation that thrives under the system’s automated irrigation and daily care.
Plant Considerations
A successful Green Divider display depends on the right mix of plants in a given box. The first thing to consider when selecting your plants is how well different types of plants can live together. Plants from different environments most often can't cohabitate. For example, succulents, which typically inhabit arid regions, should not be placed in the same box as ferns, which usually require more abundant humidity to survive.
The Green Divider offers the advantage of customizable irrigation timers for each box. For instance, a box of ferns, preferring a modest daily watering, can be managed separately from a box of aroids, which prefer for the soil to dry out between waterings.
Aesthetic Considerations
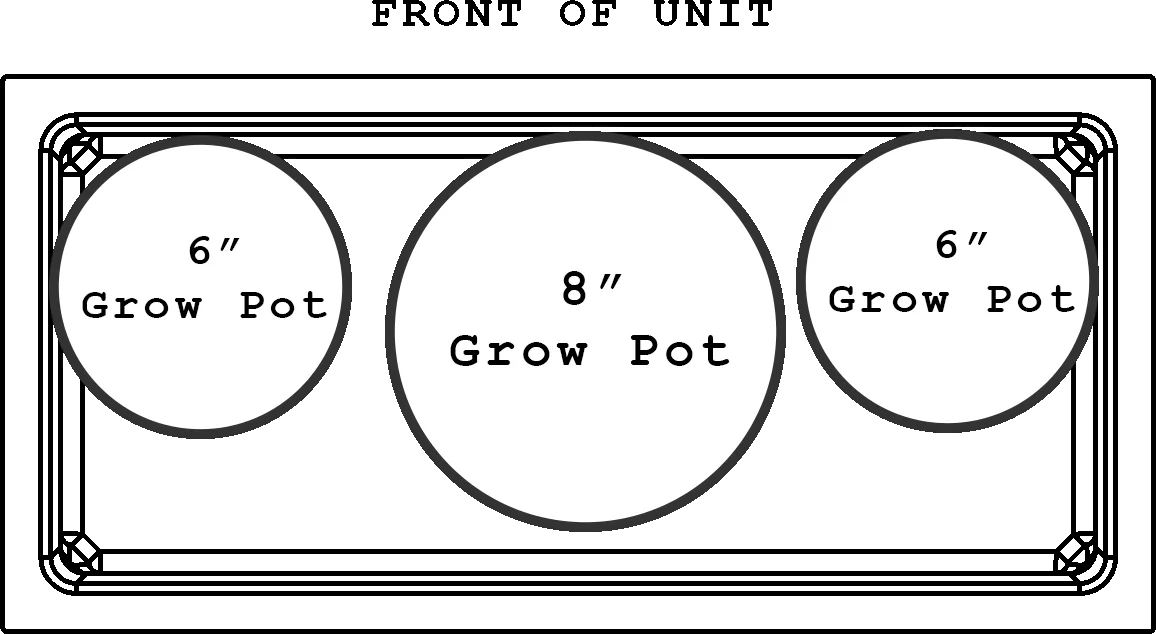
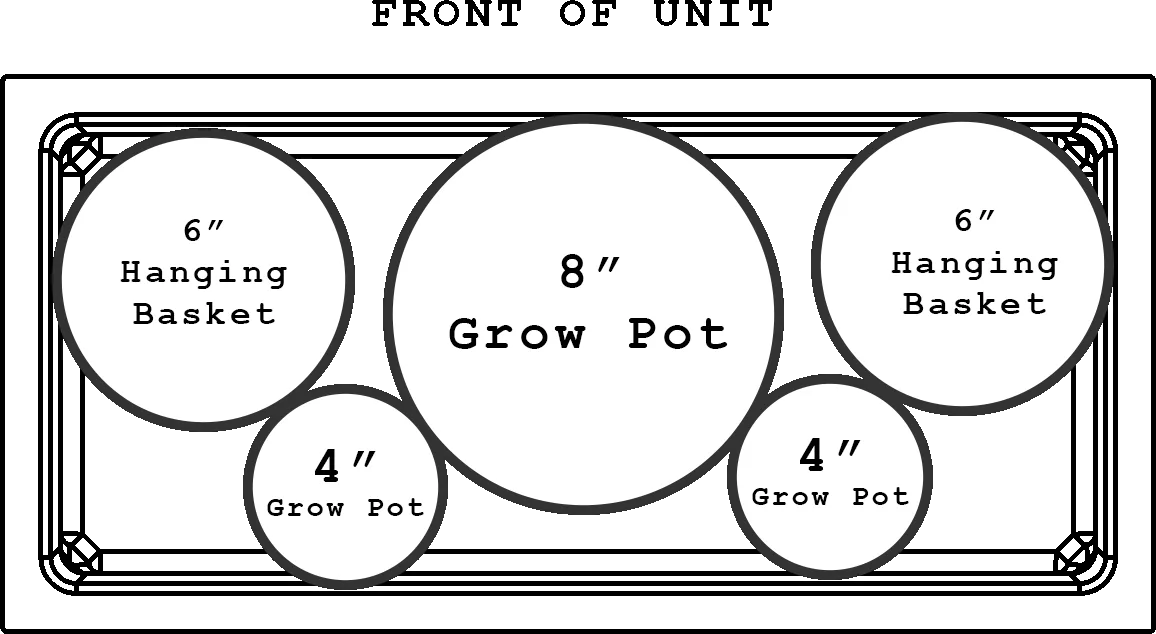
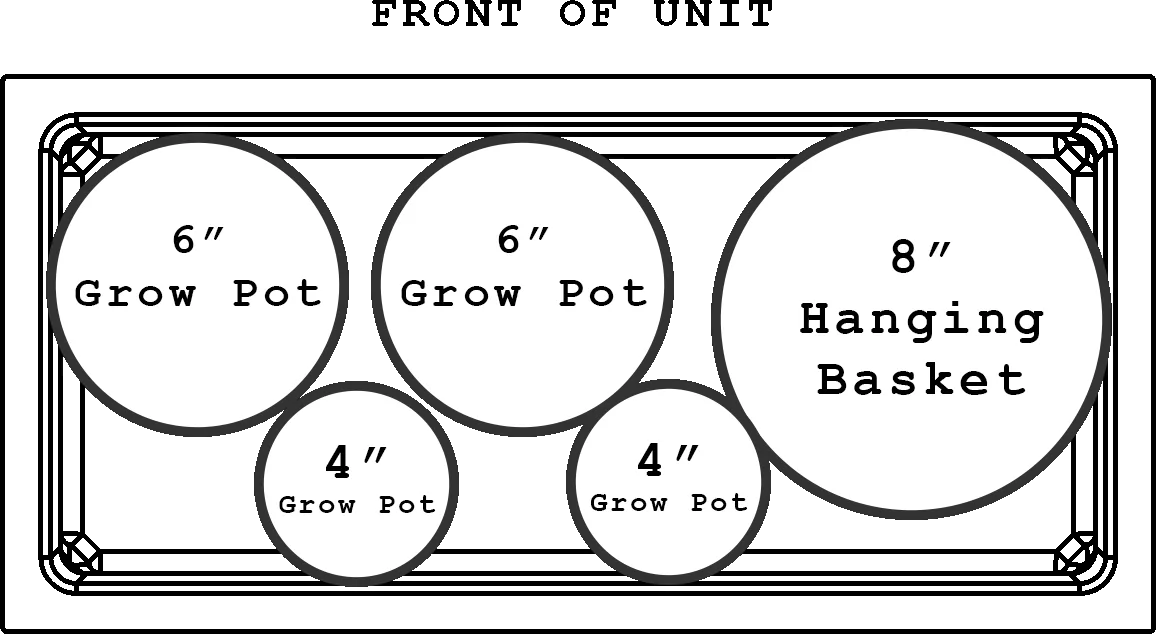
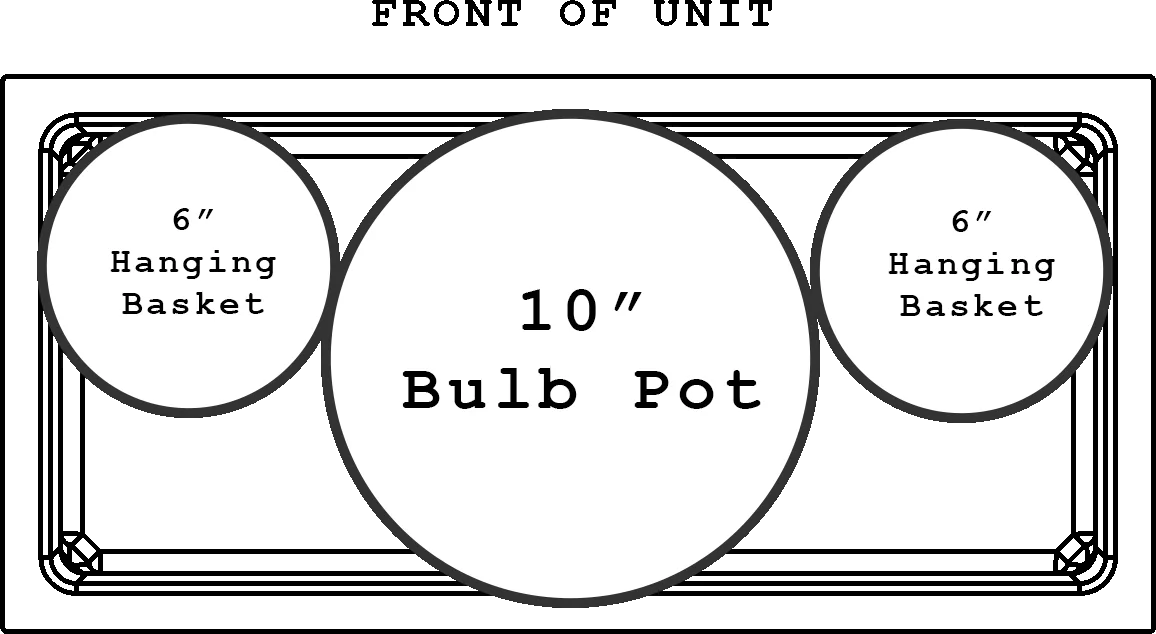
We think the Green Divider always looks best with plants "spilling" out of the boxes. With this method, plants should cover not only the edges of the boxes they are planted in but extrude up and out of the boxes. We usually try to select at least one to two plants in every divider that is bigger than the box for maximum impact. Standard nursery pot sizes that will fit in the boxes are generally 4", 6" 8" and for certain types of plants 10".
Keep in mind what the "front" of the unit will be, as you will want to angle your plants towards their intended audience. If the Green Divider is in a free standing situation and exposed on both sides, consider how the planting will appear on each side.
You will mostly want to work with a mixture of 6" and 8" nursery pots. If you stick with just 6" pots, the plants will likely take upwards of a year to fill out provided they are being fertilized regularly. 4" pots, while useable, can be problematic because they are out-competed by larger plants.
Inspiration Images
Plant Recommendations
Because the Green Divider is able to water plants automatically on a daily basis, the pallet of available plants are much greater than would be available in a typical installation where care is administered once a week. Plants don't like to be stressed, and a little water every day is usually preferrable to extended periods between watering. The following is a list of plants we have had good success with in the system:
Pothos
- The standard "easy plant," Pothos are aggressive growers that are able to deal well with stress. We typically use these as an underplanting to spill over the sides of the boxes.
Scindapsus
- Also known as "Satin Pothos," Scindapsus are closely related to Pothos and display unique patterning on the leaves. They are generally slightly more resistant to pests than Pothos.
Dracaenas
- Preferring soil that is slightly on the drier side, Dracaena has shallow root systems that make planting them in the Green Divider easy. If you're looking for a large plant that spills out of the boxes, this is a good choice.
Calatheas
- Calatheas exhibit beautiful foliar patterns and in the right conditions are able to grow extremely large leaves. Calathea have a reputation for being easy plants to kill because they don't respond well to being stressed, but with consistent moisture we have had great success with these plants.
Philodendrons
- A large family of plants that features a diverse morphological expression, Philodendrons can offer huge impressive leaf displays. The leaves will often fold towards the grow light over time, so if you are planting them in the Green Divider without a lot of ambient light it might become an issue. However, this behavior can be remedied by staking the leaves of the plant as they grow.
Monsteras
- The Monstera family includes the Monstera deliciosa also known as the "Swiss Cheese Plant," but also includes hanging varieties such as the Monstera Adansonii. Monsteras are naturally climbing plants and may either shoot out aerial roots that will hang down the side of the Green Divider, or climb up the frame.
Ferns
- Ferns are difficult plants in that they need consistent moisture, which makes them difficult to care for in an indoor setting. However, if provided with proper care they can be extremely impressive. The Green Divider makes ferns easy to maintain. We recommend a low dose of water six days a week and regular fertilizing for maximum impact.
Bromeliads
- For a pop of color, Bromeliads are a fantastic choice. The flowers will eventually die (we've kept them as long as 8 months in the Green Divider) and will need to be replaced if consistent color is desired. However, if cared for properly and fertilized they will create "pups," or new offshoots of the plants that will flower again.
Hoyas
- Hoyas are fairly pest resistant and a good choice for plants that hang over the sides of the boxes. Their thick waxy leaves come in a variety of different morphologies, and while slow growing they can exhibit beautiful growth over time.
Rhipsalis
- An epiphytic cactus, Rhipsalis do well in the Green Divider due to the consistent moisture and consistent lighting.
Creeping Fig
- AKA Ficus pumilla, Creeping Fig can cover the boxes with its tendrils and when trained can make for some truly amazing growth patterns.
Alocasias
- AKA Elephant Ears, Alocasias have a preference for moist soil, and the Green Divider is able to accommodate that through a small daily schedule. The thing to note is that Alocasias are highly phototropic, which means they are constantly adjusting their leaf orientation toward light sources. If there is not a strong external light source like a window, Alocasias have the tendancy to curve towards the grow light bars which is ultimately an unaesthetic pronouncement. For this reason we don't recommend Alocasias in rooms with little or no natural light.
The above list is meant to be used as a guide. Many types of plants can be used in the Green Divider system (including virtually all plants commonly labelled "Houseplants") and we recommend trying things out to see how they do!
Planting the Boxes
There are two methods of installing plants recommended for the Green Divider system:
Nursery Pots
Nursery Pots. The nursery pot method is recommended for beginners, and confers the following benefits to general maintenance:
- Easy plant replacements. If one of your plants begins to falter, you can very easily swap it out.
- Irrigation adjustments. Since this method doesn't use additional soil, you can see directly to the base of the planter insert. If water begins pooling up for an extended period of time, you can adjust your irrigation time to compensate.
- Fixing accidental overwatering. In the case of letting too much water build up, the planter insert can be easily removed and drained.
Direct Planting
While this method requires some horticultural knowledge to set up properly, we find this method has the best long-term results, and once the planting has become established and a watering routine has been set it significantly reduces the maintenance required.
- Better looking plants. Plants in a direct planted system have more room for their roots to spread out, and the additional soil allows for a more even exchange of moisture between plants. The growth over time is more substantial than in a nursery pot system as plants are much less likely to become root-bound.
- Less maintenance over time. As the plants adjust to their watering routine once the system has been established, the additional soil mass in a direct planted system is able to equalize moisture content throughout the planting.
- More difficult to detect overwatering. Since the box is completely planted, there is no way to directly see the water level at the base of the planter insert. Maintenance personnel will need to keep an eye on moisture levels at the base of the planter insert to prevent overwatering.
- More difficult to drain excess water. Overwatering mistakes are much more difficult to remedy with this method, as the planter inserts are much heavier in a direct planted system due to soil saturation.
Installing Nursery Pots
There are two methods of installing plants recommended for the Green Divider system:
- For best results, do not use nursery pots taller than 6" since they will peak over the box. If necessary, replant your plants in a lower nursery pot. Azalea pots, bulb pots, and mum pots are all on the shorter side and work well for installation in the Green Dividers. Here are some links to pots we recommend:
- *IMPORTANT* Make sure the drainage holes in your pot are on the very bottom. Certain types of nursery pots, especially hanging basket types, have drainage holes that are raised up from the base of the planter and thus won't be able to receive water.
- Use multiple sizes of nursery pots, and the largest nursery pots you can fit, for the best effect. The "Mum round pots" listed above will fit a 10" plant with a shallow root system, like a Dracaeana. The Green Dividers look ideal with a mixture of large and small plants.
- Soil quality is important. Cheaper soil, such as soil consisting primarily of coco-coir, is not good at retaining moisture. Other types of soil such as espoma can retain too much. If you are using ferns, make sure that the soil is capable of retaining moisture for multiple days. If you are replanting your nursery pots, we recommend using Fox Farm Ocean Forest.
- When you are done initially placing your plants, we recommend running your system for around 10 minutes to saturate the soil.
Planting Directly into the Boxes
While more difficult to administer, over time direct planting reduces the margin for error with your plants because the additional soil mass will act as a retention layer for moisture. Direct planting should always incorporate a layer of expanded clay aggregate (LECA) as drainage. If you are using smaller plants such as 4" nursery pots, ensure that the plant's root mass is receiving enough moisture.
Lighting & Leveling
When choosing a final location for the Green Divider, it is important to take into consideration the following factors:
Lighting
Since the Green Divider incorporates direct grow lighting, plants are able to survive even in the absence of additional light. The grow lights built in to the Green Divider frame emit a full spectrum light that provides about 300 Foot Candles at the foliar level. This light should be more than enough to ensure the long-term health and growth of the plants inside the Green Divider.
If the Green Divider is placed in a location far away from the window, you shouldn't need to adjust the irrigation settings throughout the year except when the AC turns on in the Spring or when the heat turns on in the Fall. However, if the Green Divider is receiving significant natural light, note that its water needs will change throughout the year as the sun's intensity fluctuates throughout the season.
Plant foliage has a tendency to turn towards the light. If there is no external lighting, certain plants will reach towards the light bars, which will leave burn marks on the leaves if they are touching for extended periods. To deal with this issue, you can either prune off the affected leaves or stake them out of the way.
Leveling
Using a level, make sure the four boxes in the Green Divider are level. If they are not, make necessary adjustments to the furniture feet or casters. If the boxes are not level, water can pool on one side of the boxes which drains the water away from plants on the opposite side. Over time this can lead to potential draught.